Home automation with Raspberry Pi – Smartlight
That little board has so many great potential and, on this entry, I’m going to show you how to create an easy and useful website hosted on our raspberry to control remotelly a light of our home. We will need a Rasbperry pi and an electromechanical relay.

Light controls will be accessible from: OUR_RPI_HOST_NAME.local/index.php
First, we have to install the following packets from the raspbian repository:
sudo apt-get install python-dev
sudo apt-get install python-rpi.gpio
sudo apt-get install apache2 php7.0 libapache2-mod-php7.0
Then, we are going to edit the sudoers file on our machine (sudo nano /etc/sudoers)adding at the bottom of file the following line:
www-data ALL=(root) NOPASSWD:ALL
It’ll allow Apache to have enought rights to execute on our machines scripts from an html request.
So, now let’s get create our python scripts to switch on and off our relay, both scripts will be created on our rpi user’s home folder and help us finish our home automation with Raspberry Pi and a relay:
We can create them with the command:
sudo nano NAME_OF_FILE.py
- lighton.py (To switch the relay on)
#!/usr/bin/python
# Import required Python libraries
import RPi.GPIO as GPIO
import time
# Use BCM GPIO references instead of physical pin numbers
GPIO.setmode(GPIO.BCM)
# init list with pin numbers
pinList = [18]
# loop through pins and set mode and state to 'low'
for i in pinList:
GPIO.setwarnings(False)
GPIO.setup(i, GPIO.OUT)
GPIO.output(i, GPIO.HIGH)
def trigger() :
for i in pinList:
GPIO.output(i, GPIO.HIGH)
# GPIO.cleanup()
break
try:
trigger()
except KeyboardInterrupt:
print " Quit"
# Reset GPIO settings
GPIO.cleanup()
- lightoff.py (To switch it off)
#!/usr/bin/python
# Import required Python libraries
import RPi.GPIO as GPIO
import time
# Use BCM GPIO references instead of physical pin numbers
GPIO.setmode(GPIO.BCM)
# init list with pin numbers
pinList = [18]
# loop through pins and set mode and state to 'low'
for i in pinList:
GPIO.setwarnings(False)
GPIO.setup(i, GPIO.OUT)
GPIO.output(i, GPIO.HIGH)
def trigger() :
for i in pinList:
GPIO.output(i, GPIO.LOW)
# GPIO.cleanup()
break
try:
trigger()
except KeyboardInterrupt:
print " Quit"
# Reset GPIO settings
GPIO.cleanup()
Finally, we have to let them execute their code on our machines:
sudo chmod a+x lighton.py && sudo chmod a+x lightoff.py
So, let’s create the user interface buttons with a simple HTML page, move to the Apache home folder:
cd /var/www/html
and there, we are going to create the index.php
sudo nano index.php
with the following content:
<html>
<head>
<meta charset="UTF-8" />
<link rel="stylesheet" type="text/css"
href="css/style.css">
</head>
<?php
if (isset($_POST['LightON']))
{
exec("sudo python /home/pi/lighton.py");
}
if (isset($_POST['LightOFF']))
{
exec("sudo python /home/pi/lightoff.py");
}
?>
<form method="post">
<button class="btn" name="LightON" style="width: 80%;
height: 80%;">ENCENDER</button>
<button class="btn" name="LightOFF" style="width: 80%;
height: 80%;">APAGAR</button><br><br>
</form>
</html>We can realize about the location of the scripts, they are at raspberry pi’s home folder (/home/pi/)
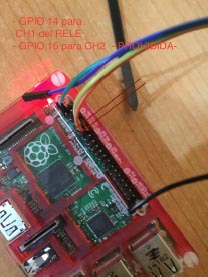
The relay wire is plugged on the 14 GPIO to give it the 5V supply and the other relay’s connector to a raspberry’s ground GPIO.

If we restart our raspberry’s Apache server, we’ll have an accesible web with switching cappabilities.
sudo service apache2 restart
If you want some more tutorials about Raspberry Pi, please check my blog posts.
That tutorial is based on “Setting up an Apache Web Server on a Raspberry Pi“.